ShopDreamUp AI ArtDreamUp
Deviation Actions


![[Inkscape] Gora Vur KRD-57 Assault Shotgun](https://images-wixmp-ed30a86b8c4ca887773594c2.wixmp.com/f/6c989e0c-9e64-4984-8fba-e3bebd0c87ab/dewocm2-0a800311-1543-40a4-b0cd-3b928ea75452.png/v1/crop/w_184,h_184,x_53,y_0,scl_0.32280701754386,q_70,strp/_inkscape__gora_vur_krd_57_assault_shotgun_by_mikeprivalis_dewocm2-92s-2x.jpg?token=eyJ0eXAiOiJKV1QiLCJhbGciOiJIUzI1NiJ9.eyJzdWIiOiJ1cm46YXBwOjdlMGQxODg5ODIyNjQzNzNhNWYwZDQxNWVhMGQyNmUwIiwiaXNzIjoidXJuOmFwcDo3ZTBkMTg4OTgyMjY0MzczYTVmMGQ0MTVlYTBkMjZlMCIsIm9iaiI6W1t7ImhlaWdodCI6Ijw9NTcwIiwicGF0aCI6IlwvZlwvNmM5ODllMGMtOWU2NC00OTg0LThmYmEtZTNiZWJkMGM4N2FiXC9kZXdvY20yLTBhODAwMzExLTE1NDMtNDBhNC1iMGNkLTNiOTI4ZWE3NTQ1Mi5wbmciLCJ3aWR0aCI6Ijw9MTIzMCJ9XV0sImF1ZCI6WyJ1cm46c2VydmljZTppbWFnZS5vcGVyYXRpb25zIl19.tJ54a2iZdTmtUXB07iht5_NVW40FVN88oM1D9juuXmo)
![[Inkscape] Gora Vur KRD-57 Assault Shotgun](https://images-wixmp-ed30a86b8c4ca887773594c2.wixmp.com/f/6c989e0c-9e64-4984-8fba-e3bebd0c87ab/dewocm2-0a800311-1543-40a4-b0cd-3b928ea75452.png/v1/crop/w_92,h_92,x_27,y_0,scl_0.16140350877193,q_70,strp/_inkscape__gora_vur_krd_57_assault_shotgun_by_mikeprivalis_dewocm2-92s.jpg?token=eyJ0eXAiOiJKV1QiLCJhbGciOiJIUzI1NiJ9.eyJzdWIiOiJ1cm46YXBwOjdlMGQxODg5ODIyNjQzNzNhNWYwZDQxNWVhMGQyNmUwIiwiaXNzIjoidXJuOmFwcDo3ZTBkMTg4OTgyMjY0MzczYTVmMGQ0MTVlYTBkMjZlMCIsIm9iaiI6W1t7ImhlaWdodCI6Ijw9NTcwIiwicGF0aCI6IlwvZlwvNmM5ODllMGMtOWU2NC00OTg0LThmYmEtZTNiZWJkMGM4N2FiXC9kZXdvY20yLTBhODAwMzExLTE1NDMtNDBhNC1iMGNkLTNiOTI4ZWE3NTQ1Mi5wbmciLCJ3aWR0aCI6Ijw9MTIzMCJ9XV0sImF1ZCI6WyJ1cm46c2VydmljZTppbWFnZS5vcGVyYXRpb25zIl19.tJ54a2iZdTmtUXB07iht5_NVW40FVN88oM1D9juuXmo)
![[Inkscape] Turion Universal Shotgun (Old Version)](https://images-wixmp-ed30a86b8c4ca887773594c2.wixmp.com/f/6c989e0c-9e64-4984-8fba-e3bebd0c87ab/depx6r8-8b41fe98-8235-46ef-9ffc-a69b94f02394.png/v1/crop/w_184,h_184,x_50,y_0,scl_0.26666666666667,q_70,strp/_inkscape__turion_universal_shotgun__old_version__by_mikeprivalis_depx6r8-92s-2x.jpg?token=eyJ0eXAiOiJKV1QiLCJhbGciOiJIUzI1NiJ9.eyJzdWIiOiJ1cm46YXBwOjdlMGQxODg5ODIyNjQzNzNhNWYwZDQxNWVhMGQyNmUwIiwiaXNzIjoidXJuOmFwcDo3ZTBkMTg4OTgyMjY0MzczYTVmMGQ0MTVlYTBkMjZlMCIsIm9iaiI6W1t7ImhlaWdodCI6Ijw9NjkwIiwicGF0aCI6IlwvZlwvNmM5ODllMGMtOWU2NC00OTg0LThmYmEtZTNiZWJkMGM4N2FiXC9kZXB4NnI4LThiNDFmZTk4LTgyMzUtNDZlZi05ZmZjLWE2OWI5NGYwMjM5NC5wbmciLCJ3aWR0aCI6Ijw9MTQ0MCJ9XV0sImF1ZCI6WyJ1cm46c2VydmljZTppbWFnZS5vcGVyYXRpb25zIl19.w0wiQ_K1bUhj6tvYVcMt-gWmiFQiHaUeHSC9v8Q41dU)
![[Inkscape] Turion Universal Shotgun (Old Version)](https://images-wixmp-ed30a86b8c4ca887773594c2.wixmp.com/f/6c989e0c-9e64-4984-8fba-e3bebd0c87ab/depx6r8-8b41fe98-8235-46ef-9ffc-a69b94f02394.png/v1/crop/w_92,h_92,x_25,y_0,scl_0.13333333333333,q_70,strp/_inkscape__turion_universal_shotgun__old_version__by_mikeprivalis_depx6r8-92s.jpg?token=eyJ0eXAiOiJKV1QiLCJhbGciOiJIUzI1NiJ9.eyJzdWIiOiJ1cm46YXBwOjdlMGQxODg5ODIyNjQzNzNhNWYwZDQxNWVhMGQyNmUwIiwiaXNzIjoidXJuOmFwcDo3ZTBkMTg4OTgyMjY0MzczYTVmMGQ0MTVlYTBkMjZlMCIsIm9iaiI6W1t7ImhlaWdodCI6Ijw9NjkwIiwicGF0aCI6IlwvZlwvNmM5ODllMGMtOWU2NC00OTg0LThmYmEtZTNiZWJkMGM4N2FiXC9kZXB4NnI4LThiNDFmZTk4LTgyMzUtNDZlZi05ZmZjLWE2OWI5NGYwMjM5NC5wbmciLCJ3aWR0aCI6Ijw9MTQ0MCJ9XV0sImF1ZCI6WyJ1cm46c2VydmljZTppbWFnZS5vcGVyYXRpb25zIl19.w0wiQ_K1bUhj6tvYVcMt-gWmiFQiHaUeHSC9v8Q41dU)
![[Inkscape] Wolfan Armory FL4K Carbine](https://images-wixmp-ed30a86b8c4ca887773594c2.wixmp.com/f/6c989e0c-9e64-4984-8fba-e3bebd0c87ab/dezgjg5-5ccb1c82-1074-420f-8d06-0c2eb5679ade.png/v1/crop/w_184,h_184,x_40,y_0,scl_0.26666666666667,q_70,strp/_inkscape__wolfan_armory_fl4k_carbine_by_mikeprivalis_dezgjg5-92s-2x.jpg?token=eyJ0eXAiOiJKV1QiLCJhbGciOiJIUzI1NiJ9.eyJzdWIiOiJ1cm46YXBwOjdlMGQxODg5ODIyNjQzNzNhNWYwZDQxNWVhMGQyNmUwIiwiaXNzIjoidXJuOmFwcDo3ZTBkMTg4OTgyMjY0MzczYTVmMGQ0MTVlYTBkMjZlMCIsIm9iaiI6W1t7ImhlaWdodCI6Ijw9NjkwIiwicGF0aCI6IlwvZlwvNmM5ODllMGMtOWU2NC00OTg0LThmYmEtZTNiZWJkMGM4N2FiXC9kZXpnamc1LTVjY2IxYzgyLTEwNzQtNDIwZi04ZDA2LTBjMmViNTY3OWFkZS5wbmciLCJ3aWR0aCI6Ijw9MTI5MCJ9XV0sImF1ZCI6WyJ1cm46c2VydmljZTppbWFnZS5vcGVyYXRpb25zIl19.TaY8r13R0-K5V1AJutam_fiJiwI4WribA06gnUnqUCI)
![[Inkscape] Wolfan Armory FL4K Carbine](https://images-wixmp-ed30a86b8c4ca887773594c2.wixmp.com/f/6c989e0c-9e64-4984-8fba-e3bebd0c87ab/dezgjg5-5ccb1c82-1074-420f-8d06-0c2eb5679ade.png/v1/crop/w_92,h_92,x_20,y_0,scl_0.13333333333333,q_70,strp/_inkscape__wolfan_armory_fl4k_carbine_by_mikeprivalis_dezgjg5-92s.jpg?token=eyJ0eXAiOiJKV1QiLCJhbGciOiJIUzI1NiJ9.eyJzdWIiOiJ1cm46YXBwOjdlMGQxODg5ODIyNjQzNzNhNWYwZDQxNWVhMGQyNmUwIiwiaXNzIjoidXJuOmFwcDo3ZTBkMTg4OTgyMjY0MzczYTVmMGQ0MTVlYTBkMjZlMCIsIm9iaiI6W1t7ImhlaWdodCI6Ijw9NjkwIiwicGF0aCI6IlwvZlwvNmM5ODllMGMtOWU2NC00OTg0LThmYmEtZTNiZWJkMGM4N2FiXC9kZXpnamc1LTVjY2IxYzgyLTEwNzQtNDIwZi04ZDA2LTBjMmViNTY3OWFkZS5wbmciLCJ3aWR0aCI6Ijw9MTI5MCJ9XV0sImF1ZCI6WyJ1cm46c2VydmljZTppbWFnZS5vcGVyYXRpb25zIl19.TaY8r13R0-K5V1AJutam_fiJiwI4WribA06gnUnqUCI)


Description
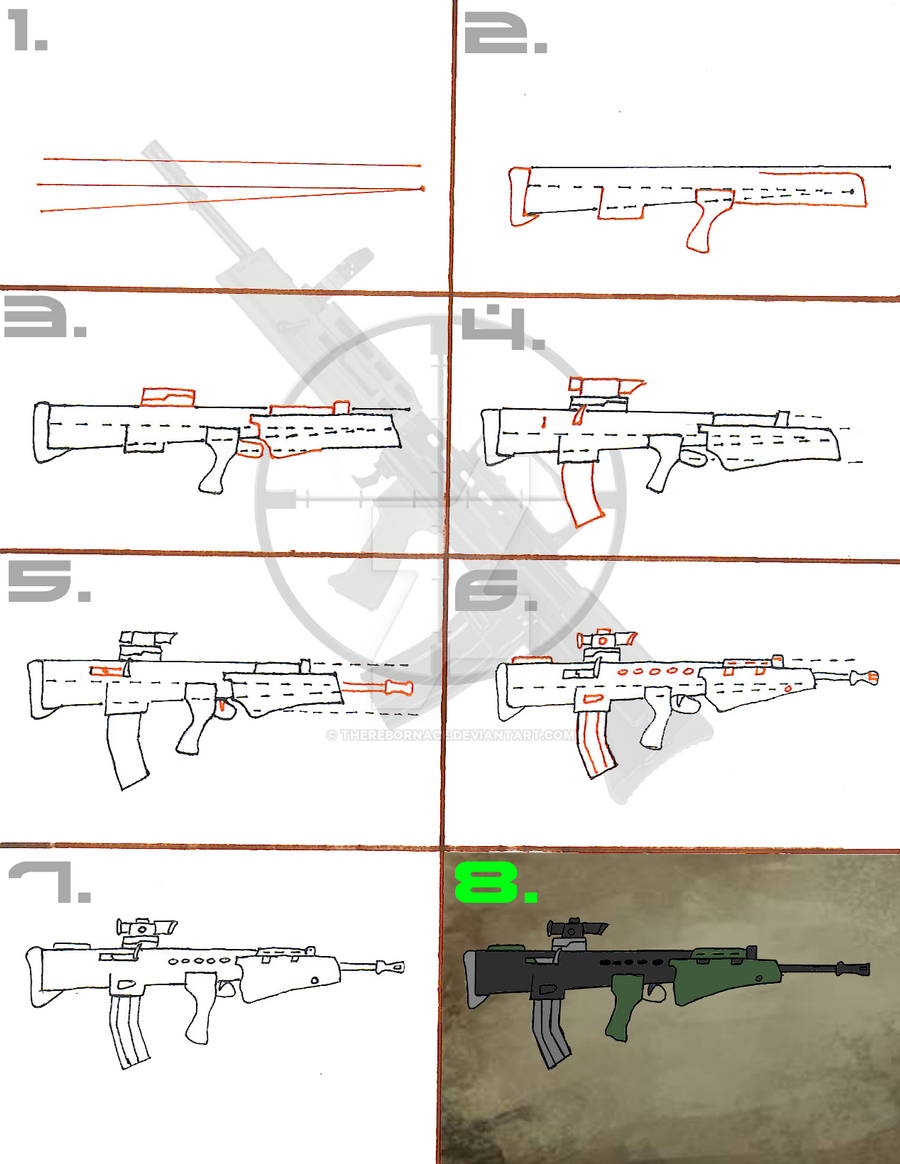
This is a tutorial on how to draw bullpup rifles, those with rear-mag features. This tutorial is meant for beginners rather than intermediate or advance artists or those who already know how to draw guns/rifles well. This is an 8 easy step process and I use it as well. It really get things done quickly and efficiently, especially for those that illustrate their own comic book that involves guns.
Symbols:
-dash lines: These represent guidelines and lines you'll be erasing after you have inked your drawing.
-black solid lines: These are previous draw lines from previous step(s). Also they are lines you'll keep at the very end to ink.
-red solid line: This represent what to draw next in the new step.
Please forgive me if my wording is confusing or how the drawing or lining does not completely match each other.
I would like to say, this is not the only way to draw guns. There are many ways to do it but this is tutorial is more for those who are very inexperience in drawing guns and could use a lot of help. So here are the explained steps:
1.) Draw 2 parallel lines to the needed length. Angle the third line so one end of the line is touching one end of the second parallel line and the other end about half a centimeter below it.
2) Now draw the stock cushion at the rear of the gun. Draw the pistol grip about halfway on the angled line. Now draw the magazine socket equal distance from the cushion and the grip. As for the hand guard, draw a straight line from the front of the pistol grip as indicated. Draw it out until the needed length. Now draw a line slightly angled upward towards the first parallel line BUT do NOT touch. Then draw a straight line inward towards the back of the gun, about 1/4 the distance of the rifle and then stop.
3.) Now add the scope-rest piece. Add the trigger guard. Add the front iron sight rest piece. Now, here's the tricky part. From the top line of the left side of the hand guard you drew, add a couple of right angles going down towards the bottom of the hand guard. But instead of stopping at the line, pass it slightly and draw a gentle curve upward, connecting it back to the bottom line of the drawn hand guard.
4.) Now add a sight (ACOG, Holographic Sight, etc.) on the scope-rest piece. Add a line that is above the second parallel line that is about between the stock end and the mag socket. Draw the pull-back bolt a little over from the line you just drew. Now add the mag in the mag socket.
5.) Complete the shell-ejection compartment. Add the trigger. Now add the barrel. The end of a barrel should include some form of flash hider. But for stealth, add a silencer.
6.) Add in the last few details of your rifle. Most of it should be those holes you see on most rifles.
7) Now ink your drawing, and wait for it to dry. Now erase any excess guidelines that was not included in your drawing.
8.) And there you go! You have drew your own rifle. You can now either color it, photoshop it, paint it, or share it with your friends, or just keep it in a folder for personal usage and references.
I hope this was helpful and I may later in the future add more tutorials for other types of rifles/guns.
You have permission to use this tutorial for your full benefit.
Image size
1269x1640px 834.1 KB
© 2012 - 2024 TheRebornAce
Comments8
Join the community to add your comment. Already a deviant? Log In
And thus, you have L85.....